Easy Easter DIY Necklace Step-by-Step - Paired with Estate Sauvignon Blanc
- Julianne Winter

- Apr 4, 2022
- 5 min read
Updated: Apr 5, 2022
I can't believe the bunny is already hopping his way into town! 2022 is flying, but while we think about the Easter baskets ahead, lets first turn our attentions to a fun craft project that we can make together that pairs perfectly with our Estate Sauvignon Blanc. A craft project that would be a perfect gift for that egg hunter in the family!
Shall we hop to it??
We all remember being a kid and hearing about Shrinky Dinks for the first time, right? I think I was in high school art class when I made my last Shrinky Dink. It was like magic watching my drawings shrink down to a fraction of their original size and become a sturdy little keepsake.
As a crafty adult, when I heard about shrink plastic necklaces and earrings, and other such jewelry, I wondered... you mean Shrinky Dinks? I think the name shrink plastic makes it sound a bit more mature though, don't you think? So let's head to the craft store and pick up some shrink plastic and supplies to make this adorable charm necklace, perfect for Easter!
Materials Needed:
Shrink Plastic (aka Shrinky Dinks)
Paint Pens (Posca is my favorite) or Acrylic Paint
Scissors
Hole Punch
Necklace chain (pre-made necklace with a fasten so you just need to add the pendants/charms
Jump Rings
2 Pliers

Step-by-Step:
Before we begin, let's pour ourselves a glass of Clos LaChance Sauvignon Blanc, a crisp, citrusy pairing for this fun-filled craft!
First we Need to Draw our Characters
Watch our YouTube video above to see the drawing portion of this craft project from start to finish, or use the images below as a guide. For this project, we will be making a bunny with floppy ears holding a carrot, a chick holding an Easter egg, and... well, an Easter egg or two! NOW, SIP THAT VINO!

PHOTO TUTORIAL:
Draw a circle with white paint for the bunny head, and two ovals above connected to the main circle for the bunny's head as you see below. Draw the chick outline with yellow paint leaving a small portion in the center un-filled where he is holding an Easter egg. Notice there are two little parts that go in on the sides which will later become the upper portion of the chick's wings.

Draw an Easter egg on the right, using your imagination for whatever pattern you'd like it to have, be it zig-zags, stripes, spots, swirls, etc! Get creative! Then, with pink paint, you will make a sideways oval slightly above the center of the bunny's face circle for the nose. Above you will fill in the underside of the floppy ears. See image below for reference.

Using black paint, make the eyes of the bunny on either side of the nose. They look like upside-down commas!

Make hooks under the nose coming from the center to either side so that he has a mouth. Also, make little arms apart enough so that we still have room to paint the carrot that he will be holding.

Speaking of carrots, let's use our orange paint and make bun-buns holding a carrot. The carrot shape is very similar to the egg shape. You could make a more pointed carrot if you'd like too.

Also, paint the egg that the chickadee is holding. Again use your imagination as to how you'd want the egg to look. There is no wrong answer, just creativity!

Add the greenery to the carrots. Just 3 little "U" shapes will do!

With orange paint, add an orange beak to the chick that looks like a skinny heart laying flat. Fill in with the orange, we will be outlining the beak with black later for more definition.

Let's give the chickadee some eyes, just as we did for the bunny. I added some thin eyebrows to him as well.

Outline the underside of the folded ears on the bunny. Also, using the image below as a reference, give the chick some wings and finish outlining the chick's egg, the bunny's carrot, and anything else you'd like to outline!


Time to Get the Oven On!
Pre-heat oven to between 300-350 degrees Fahrenheit (depending on the accuracy of your oven temperature). Then have a sip before we continue...

...and don't forget to have fun!

Cut, Punch, Bake, & Seal
Cut: After your characters are painted and dry, cut them out along the outside edge of the paint (Pro tip: Make sure for tight spaces, like under the bunny's ears, to come in from either side with your scissors rather than pivoting the scissors quickly and potentially tearing the plastic). DID YOU TAKE ANOTHER SIP? Don't worry, I'll wait...

Punch: Use a small hole punch to punch holes through the top of your unbaked charms, making sure to leave an edge of plastic around the entire circle.

Bake: Place on a parchment lined baking sheet with another sheet of parchment on top. Bake for 2 minutes (watching the whole time while sipping your wine of course!) until charms have folded up on themselves and completely unfolded and flattened back down a mere 1/3 of their original size. Remove from oven, and use a spatula to flatten completely if slightly raised on any side. Cool completely.


Seal: Using Mod Podge, apply a coat to the painted side of the finished charm. Let dry for 1-2 hours, pour another glass of Sauvignon Blanc, and repeat until you've done 2-3 coats of Mod Podge.

Let's Make Some Jewelry!
Using your pliers, open up a jump ring and push one end through the hole of the charm (you may need to push through the layers of Mod Podge if they covered the hole when they were applied).
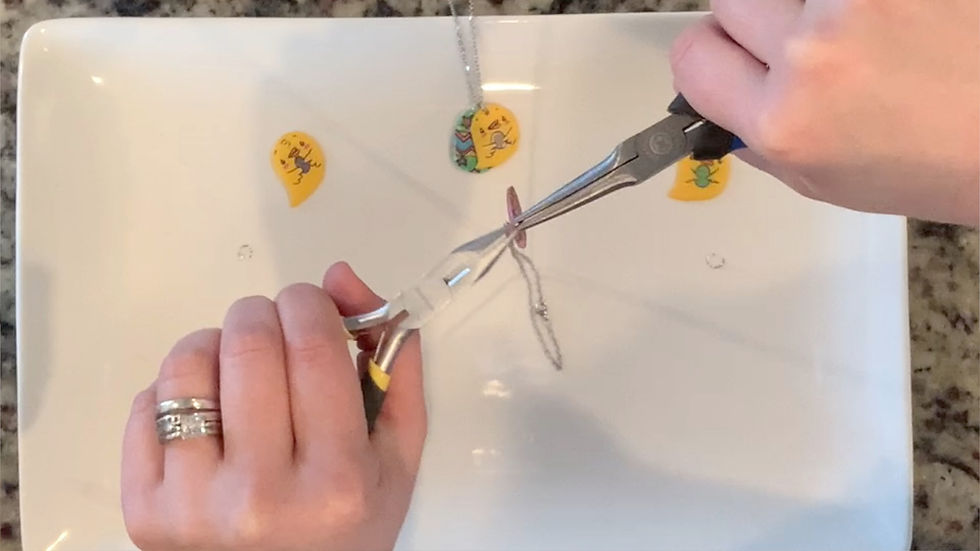
Option 1: Lay the necklace chain into the open jump ring as well and with your pliers, close the jump ring around the chain. Repeat this process for your other charms.

Option 2: If you don't want your charms to be moving freely on the necklace chain, you can put the jump rings through the individual links along the necklace chain and close them with your pliers. They will stay in the link you put them. Repeat this process for your other charms.

Your Easter charm necklace is now complete! It's time to wear it yourself, or tuck it in an Easter egg for your littles to find. Cheers to another job well done! So, there you have it! A fun, lightweight, Easter pendant necklace that is quick to work up and will last for many Easters to come!
If you'd like more Easter fun, check out our other blog post and video about making some easy, piped buttercream roses to take your cupcakes to the next level for Easter Sunday!


Comments